

My brother got me this wooden racing car construction kit for Christmas.

The instructions were difficult to get my head around.
I even managed to put one of the parts in the wrong way. Can you spot the mistake?

In trying to fix it, I managed to break the piece completely.

But not to worry — as I added more pieces, everything stayed together anyway.

It’s beginning to look like a racing car now.

The wings were particularly fiddly. The front wing bits are attached just by clinging onto the nose cone like a bat. As such, they kept on falling off.

The wheels were also a bit of a pain.
The instructions said this would take three hours. It probably took me four.

The finished product looks good, but it falls apart quite easily.

I had considered painting it, but I think I’ll leave it in the nude.
Despite the frustrations, I had fun making it.
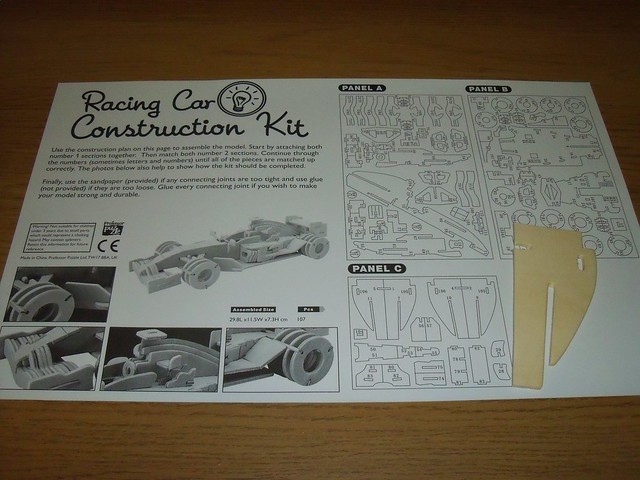
I just came across this website as I received this construction kit for Christmas, although the box is different and it included a 2 page Motorsport Quiz Book. I agree with your comment about the instructions being very difficult, I have no idea how or where to start, it says to put both pieces labelled 1 together then both number 2 and so on but looking at the list of parts I don’t see any labeled 1 (or 2 as it happens) so I have no idea where to start so some advice would be very much appreciated as I don’t want to do it wrong and end up breaking it by accident. Thanks.
Owen, thank you for your comment.
To start, you will need to piece together pieces 1, 2, 3, 4 and 5 more or less at once.
1, 2, 4 and 5 can be found at the top of panel C:
Attach these to a piece labelled 12345 at the bottom-left of panel B:
The second 3 piece can be found on the largest piece of panel A, which sits diagonally towards the bottom of the panel.
Hope this helps.
Thank you for the reply, I shall give it a go.
Had the same problems even broke a piece in the same place ….almost finished just trying to figure out how the wheels fix on to the car lol
Hello
you could place the planes of all the pieces of the panel A, B, C
thanks
Well the instructions are total garbage. You’r not putting togeter parts 1/1,2/2, you’r slotting slot 1 into slot 1 on two unlabled parts. And maybe getting a vague hint from an unhelpful box photo. I have completed the model, but the annoyances of the build didn’t make it that enjoyable.